色々頓挫中・・・(-_-;
テキストをとりあえず表示させるのにベタがきはちょっと意識高くなさそうなのでメッセージアプリの吹き出しっぽい表示がいいのかなと思い調べてみた。先人の投稿とコードにはお世話になります・・・
無駄とは思うけど極力既成のライブラリ利用は避けられたらいいかなと。Swift の基礎が残念なので自分でやってみないと覚えないし・・・
とっかかりのサイトが以下
http://www.swiftaweek.com/example/2016/08/14/bubble.html
で、その先に紹介してあるコードが以下
https://github.com/tnantoka/swift-a-week/blob/gh-pages/works/Bubble.playground/Contents.swift
# GitHub のソースにダイレクトはよろしくないんだろうか・・・?
今の環境で動作するように書いたコードが以下。
class Balloon: UIView {
    let padding: CGFloat = 5.0
    let cornerRadius: CGFloat =  15.0
    override func draw(_ rect: CGRect) {
        guard let context = UIGraphicsGetCurrentContext() else {
            return
        }
        UIColor.white.setFill()
        context.fill(rect)
        var balloonRect = rect
        balloonRect.origin.x += padding
        balloonRect.origin.y += padding
        balloonRect.size.width -= padding * 2.0
        balloonRect.size.height -= padding * 2.0
        balloon(context: context, rect: balloonRect)
    }
    private func radian(_ degree: CGFloat) -> CGFloat {
        return degree * CGFloat.pi / 180.0
    }
    private func arc(context: CGContext, x: CGFloat, y: CGFloat, startAngle: CGFloat, endAngle: CGFloat) {
        context.addArc(center: CGPoint(x: x, y: y), radius: cornerRadius, startAngle: radian(startAngle), endAngle: radian(endAngle), clockwise: false)
    }
    private func balloon(context: CGContext, rect: CGRect) {
        let arrowWidth: CGFloat = 8.0
        let arrowHeight: CGFloat = 25.0
        let arrowTopCurveHeight: CGFloat = 4.0
        let leftX = rect.minX + arrowWidth
        let rightX = rect.maxX
        let topY = rect.minY
        let bottomY = rect.maxY
        context.beginPath()
        context.move(to: CGPoint(x: leftX, y: topY + cornerRadius))  // スタート地点
        arc(context: context, x: leftX + cornerRadius, y: topY + cornerRadius, startAngle: 180.0, endAngle: 270.0)  // 1 から 2
        arc(context: context, x: rightX - cornerRadius, y: topY + cornerRadius, startAngle: 270.0, endAngle: 360.0)  // 2 から 3
        arc(context: context, x: rightX - cornerRadius, y: bottomY - cornerRadius, startAngle: 0.0, endAngle: 90.0)  // 3 から 4
        arc(context: context, x: leftX + cornerRadius, y: bottomY - cornerRadius, startAngle: 90.0, endAngle: 135.0)  // 4 から 5
        context.addQuadCurve(to: CGPoint(x: leftX - cornerRadius, y: bottomY), control: CGPoint(x: leftX - arrowWidth, y: bottomY))  // 5 から 6 (吹き出しの先端です)
        context.addQuadCurve(to: CGPoint(x: leftX, y: bottomY - arrowHeight), control: CGPoint(x: leftX, y: bottomY - arrowTopCurveHeight))  // 6 から 7
        context.closePath()  // 7 から 1
        UIColor.black.setStroke()
        context.strokePath()
    }
}
クラスにしなくてもいいと思うけど。なんとなく。現状の環境に適用する変更と、名称と若干の微調整。元のソースのままだと綺麗に描けないのでそこも手直し。
呼び出すときは以下。
let balloon = Balloon(frame: CGRect(x: 0, y: 0, width: 200, height: 100))
balloon.draw(balloon.frame)
self.addSubview(balloon)
適当な UIViewController の中で呼び出せばそれっぽいのが。
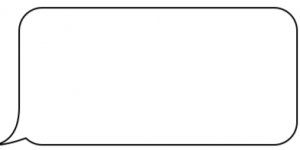
線を描いてこの形に。
スタート地点は context.move で指定した場所。以下でいうと矢印の先がスタート地点。
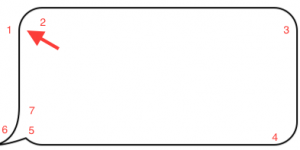
あとは時計回りに線を描画して一筆書き。
ひとまずのガワができた・・・。
あとはこれに UITextView をくっつける感じか・・・。
addQuadCurve については以下のサイトを参考に学ばさせてもらいました。